Welcome to yoga workshop Fridays! Don’t know what I am talking about, check out this post.
This series will be each Friday explaining how to do a particular pose leading up to a peak pose on the last Friday of the month. Throughout this series, I ask that you listen to your body to prevent injury and warm up for a pose when needed.
Disclaimer: Though I am a certified yoga instructor, please consult your doctor before you begin practice and note that everyone’s practice may look a bit different as you align the pose to your body.
Happy Friday! Today we are talking about pigeon pose or eka pada rajakapotasana in sandskrit which translates to one footed king pigeon pose. The full version of this pose involves bending the back knee and grabbing the back foot and maybe even bringing it to your head. However, I am just going to talk about the pose with the back leg on the ground. If you are more advanced and want to work on grabbing the back foot, please go ahead and do so.
In my classes, I usually have my students go into pigeon from downdog. You can also set up by starting on all fours. If you are taking the downdog route, I like to warm up and then do a few downdog crunches. Once you have warmed up as this is a deep stretch for the hips, you can follow the steps below. I also have included some prop suggestions. If you are not warmed up enough or a beginner to this pose, I highly suggest the props.
How to do the pose
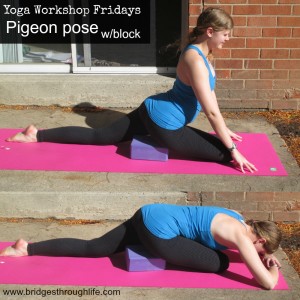
Begin in downdog, inhale the right leg up for downdog split. Exhale as you bring the knee behind the right wrist. For beginners, keep the foot closer to the hip. If you want more of a stretch, bring the foot out so that it is closer to parallel. Make sure to flex the foot to protect the knee. Lower the back knee to the mat and untuck the toes so that he ties are pointing straight back. Keep your weight centered over the hips so that you are not falling to one side. If your hip is lifted off the ground a lot, you may consider a block to sit on (see props below).
Sit up tall through the spin and if you feel comfortable, begin to lower onto your forearms or extend your arms out in front of you and bring your forehead down to the mat. Make sure to remember to breathe and keep the weight between the hips over the center.
To get out of the pose, slowly walk your hands back in towards your knees, press your hands into the ground as you carefully lift your front leg up and back to downdog split. Then release the foot back down to the ground and go to the other side.
Props
There a few ways you can use props in this pose. Firstly you can put a blanket under your back knee. You can also use a blanket under your hips if you find it lifting a bit. If your hip is really high, place a block (maybe even two) under your hip as I show in the photo.
Another option – Figure 4 pose
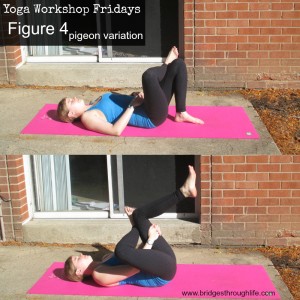
If you find that pigeon pose is too much on your hip or knees, feel free to take it on your back. Lie down on your back and cross one ankle over the opposite thigh. Weave your hands through and pull that thigh towards you for figure 4 pose on your back.
Benefits:
- Stretch groins and psoas
- Opens hip joint
- Stimulates internal organs
- Increases hip flexibility
Share your pose on Instagram, tagging @bridgesthroughlife and hashtags #bridgesthroughlife #yogaworkshopFridays
I hope you enjoy this series. If you have any suggestions for what poses you would like me to break down, I would love to hear from you. Leave a comment or send me an email [email protected]
Sharing is Caring:


Leave a Reply