Welcome to yoga workshop Fridays! Don’t know what I am talking about, check out this post.
This series will be each Friday explaining how to do a particular pose leading up to a peak pose on the last Friday of the month. Throughout this series, I ask that you listen to your body to prevent injury and warm up for a pose when needed.
Disclaimer: Though I am a certified yoga instructor, please consult your doctor before you begin practice and note that everyone’s practice may look a bit different as you align the pose to your body.
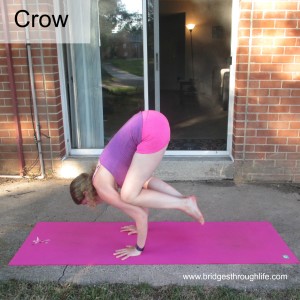
Hey it’s the last Friday of the month, which I am kind of sad about, but at the same time I am really excited about sharing this pose with you. Crow pose (Bakasana) is one of my favorite arm balances. I will admit it was a love/hate relationship for a while. When I started doing yoga more regularly in 2012, every time crow would come up in class, I would hate it. I could never get it. Then in 2014 I made it my goal to get it as I felt so close.
After I lost my job in 2014, I started doing Instagram yoga challenges and when crow came up again, I continued to practice it a little bit each day. It took me a month or so before I could finally hold it for a full breath. Note that I was already really close, but it does go to show that practice helps you get there and I am still working on it as I really want to get to straight arms for crane pose, someday. My beginner tips I share below are what helped me, so please read even if you have felt discouraged with crow in the past.
Caution: if you have had recent wrist injuries or shoulder injuries, you should not practice this pose. As always consult with your doctor if you are unsure.
How to do the pose:
Beginner Recommendations:
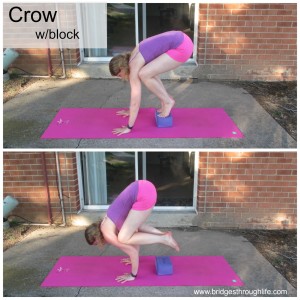
If you are a beginning to doing crow pose, I suggest having a block or a thick book (you know those textbooks from college you are looking for uses for) to stand on. The block/book helps to bring your hips up and make it easier to get your knees into your armpits as I will walk you through below.
Bend your knees coming down to a squat. Place your feet together on the block, thighs apart, and lift the heels up so you are perched on the block/book on your toes. Place your hands on your mat in front of you, fingers spread wide and practice clawing the mat, really scrunch your fingertips in and get a feeling for that. You want to be pressing into all 10 fingers as you hold yourself up in the pose.
Then lift your hips up and bring your knees into your armpits, you can bend your elbows a bit here as your arms will form a shelf for your legs. Begin to practice leaning forward a bit, putting your weight into your hands. It can be scary at first and if you are afraid of face planting, you can place a pillow in front of your hands. Keep your gaze in between your hands or slightly forward of the hands. This is important to help you balance. Slowly practice lifting one foot at a time to start and then work on trying to lift both feet off the block. Keep your spine rounded. Really work on engaging the core muscles by drawing the belly in and firmly pressing into the mat with all 10 fingertips.
More Advanced:
You can start from malasana or from a forward fold. From malasana, bring your feet together, keeping the thighs apart. From forward fold, bend your knees and come down to squat position. Place your hands firmly on the mat in front of you. Begin to bring your knees by your armpits, you can lift the heels to come to the ball of your foot if that helps. More advanced, you can bring your knees next to your armpits, so that your arms are inside your knees just like in malasana. This will help you for working on straight arms.
Once you have your knees in place, lift the hips and lean forward, shifting the weight into your hands so that your feet float up. Keep the toes together and pointed and engage your core as you hold for a couple breaths. Keep your gaze just past your hands on the mat.
As I mentioned above, you can work to straight arms if you have your knees to the sides of your armpits. You will want to draw the belly in, press into the hands evenly and begin to work on straightening the elbows coming to crane pose.
Benefits:
- Strengthens upper arms
- Improves balance
- Strengthens the core and pelvic floor
- Builds Confidence
Share your pose on Instagram, tagging @bridgesthroughlife and hashtags #bridgesthroughlife #yogaworkshopFridays
I hope you enjoy this series. If you have any suggestions for what poses you would like me to break down, I would love to hear from you. Leave a comment or send me an email [email protected]
Sharing is Caring:


Leave a Reply