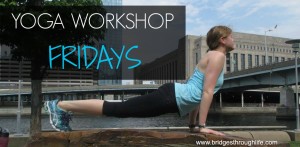
Welcome to week 4 of yoga workshop Fridays. You can check out the first post here.
This series will be each Friday explaining how to do a particular pose leading up to a peak pose on the last Friday of the month. Throughout this series, I ask that you listen to your body to prevent injury and warm up for a pose when needed.
Disclaimer: Though I am a certified yoga instructor, please consult your doctor before you begin practice and note that everyone’s practice may look a bit different as you align the pose to your body.
I am excited for today as we talk about the chaturanga and what we call a vinyasa in a vinyasa class. A “vinyasa” is the movement from plank down to chaturanga inhaling to updog and exhaling back to downdog. We already went in depth on downward facing dog last week, so today we will start from plank pose.
How to do the poses:
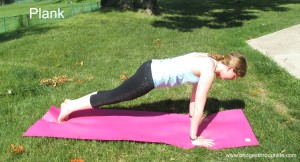
Begin on your hands and knees, bringing your wrists under your shoulders. Then tuck the toes and straighten your legs, imagining a line from the top of your head to your feet. Draw your belly button in, keeping the core tight. Keep the weight between your hands even. You can hold here for a couple breaths.
From plank, you will lower down into chaturanga (four limbed staff pose) on an exhale.
Caution: You should not practice full chaturanga if you are pregnant, have any wrist, shoulder or elbow injuries. Please use caution and if something does not feel right, do not continue. You can always do a modified version by bringing your knees down and beginning to build the strength in your upper body first.
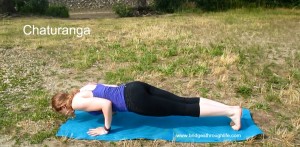
To lower to chaturanga, come to your tip toes and shift forward. Elbows point straight back (<– really important!!) and remain over the wrists as you begin to lower in one solid piece (yes lower that butt with your body too!!). Do NOT let the shoulders drop lower than the height of the elbows!! You should aim to form a 90 degree angle with your shoulder, elbow and wrist. Practice hovering here to build strength. Don’t let the elbows splay out to the sides, hug them in.
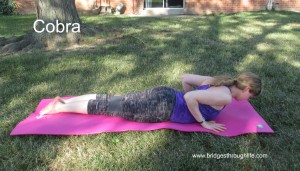
From here, you have two options, you can continue, with control, lowering down all the way to the mat and then lift the chest forward and up, keeping your elbows by your sides and bringing your gaze just past the front of your mat for cobra pose (Bhujangasana). You do not want to crank the neck back as that strains it, but instead keep the back of your neck long. This pose is a baby backbend and you should not have too much weight in the hands. Practice lightly lifting the hands off the mat, if you would like, while maintaining the backbend, for an added challenge.
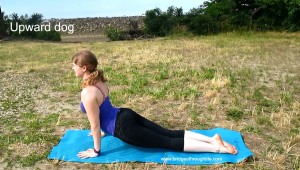
For the second option, as you lower down, shift forward, rolling to the tops of the toes, and then press to straight arms for upward facing dog (Urdhva Mukha Svanasana). Ideally your thighs should never touch the mat. Thighs should be rolling in and elbow creases should be facing out, external rotation of the arms.
This is a challenging transition and even I have trouble rolling on top of my toes as I lower, so remember you are not alone here. You can always lower down and then flip onto the tops of the toes and then press into the hands until you are at straight arms, bringing that gaze straight forward. Just make sure you have your shoulders above your wrists.
Alright that was a lot of information, but I wanted to cover the full vinyasa flow together. Next week we will put together a full sun salutation with all the basics. Remember to take it at your own pace, maybe that means taking it slow and taking a couple breaths in each pose or maybe that means doing one breath per movement and flowing quickly to build up a sweat. Find what works for you.
Benefits:
Tones all the core muscles
Improves posture
Strengthens spine, arms and wrists
Share your poses on Instagram, tagging @bridgesthroughlife and hashtags #bridgesthroughlife #yogaworkshopFridays
I hope you enjoy this series. If you have any suggestions for what poses you would like me to break down, leave a comment or send me an email [email protected]
Sharing is Caring:
Leave a Reply